Modern Residential Exterior Penetration Sealing Systems for Protecting Walls Around Utility Pipes and Cables
Every pipe, cable, and vent that passes through an exterior wall leaves a hole in the building’s weather skin, and water is patient. It does not need a large opening. A gap the width of a coin around a hose bib, a dried-out bead of caulk behind a cable, or a flashing tape that peeled back one winter is enough to let rain into a wall cavity, where it soaks insulation, feeds mould, and rots framing for years before anyone sees a stain indoors.
The short answer is that a modern exterior penetration sealing system works in layers: the water-resistive barrier is cut and lapped shingle-style around the opening, flexible flashing tape or liquid flashing seals the barrier to the utility, a compatible sealant fills the annular gap, and a flange, escutcheon, or storm collar sheds bulk water away from the joint. No single layer does the job alone, and the layers must be installed in the right order, because water always finds the layer that was skipped.
Why Every Pipe and Cable Through a Wall Is a Leak Waiting to Happen
A wall is built to shed water from the outside in, with each layer overlapping the one below it like shingles. A penetration breaks that pattern. The hole interrupts the siding, the water-resistive barrier, and sometimes the sheathing, and the utility passing through it moves with temperature and vibration, working any rigid seal loose over time. The result is a joint that starts tight and slowly opens, often without any visible change on the outside of the house.
The damage stays hidden because the wall cavity hides it. Water entering around a penetration soaks the insulation first, which loses its thermal value when wet, then reaches the framing, where it can cause rot that only shows up when a window is replaced or a wall is opened for another reason. Sealing penetrations properly at installation, and re-checking them on a schedule, is one of the cheapest forms of insurance a house can have.
What a Complete Exterior Penetration Seal Actually Consists Of
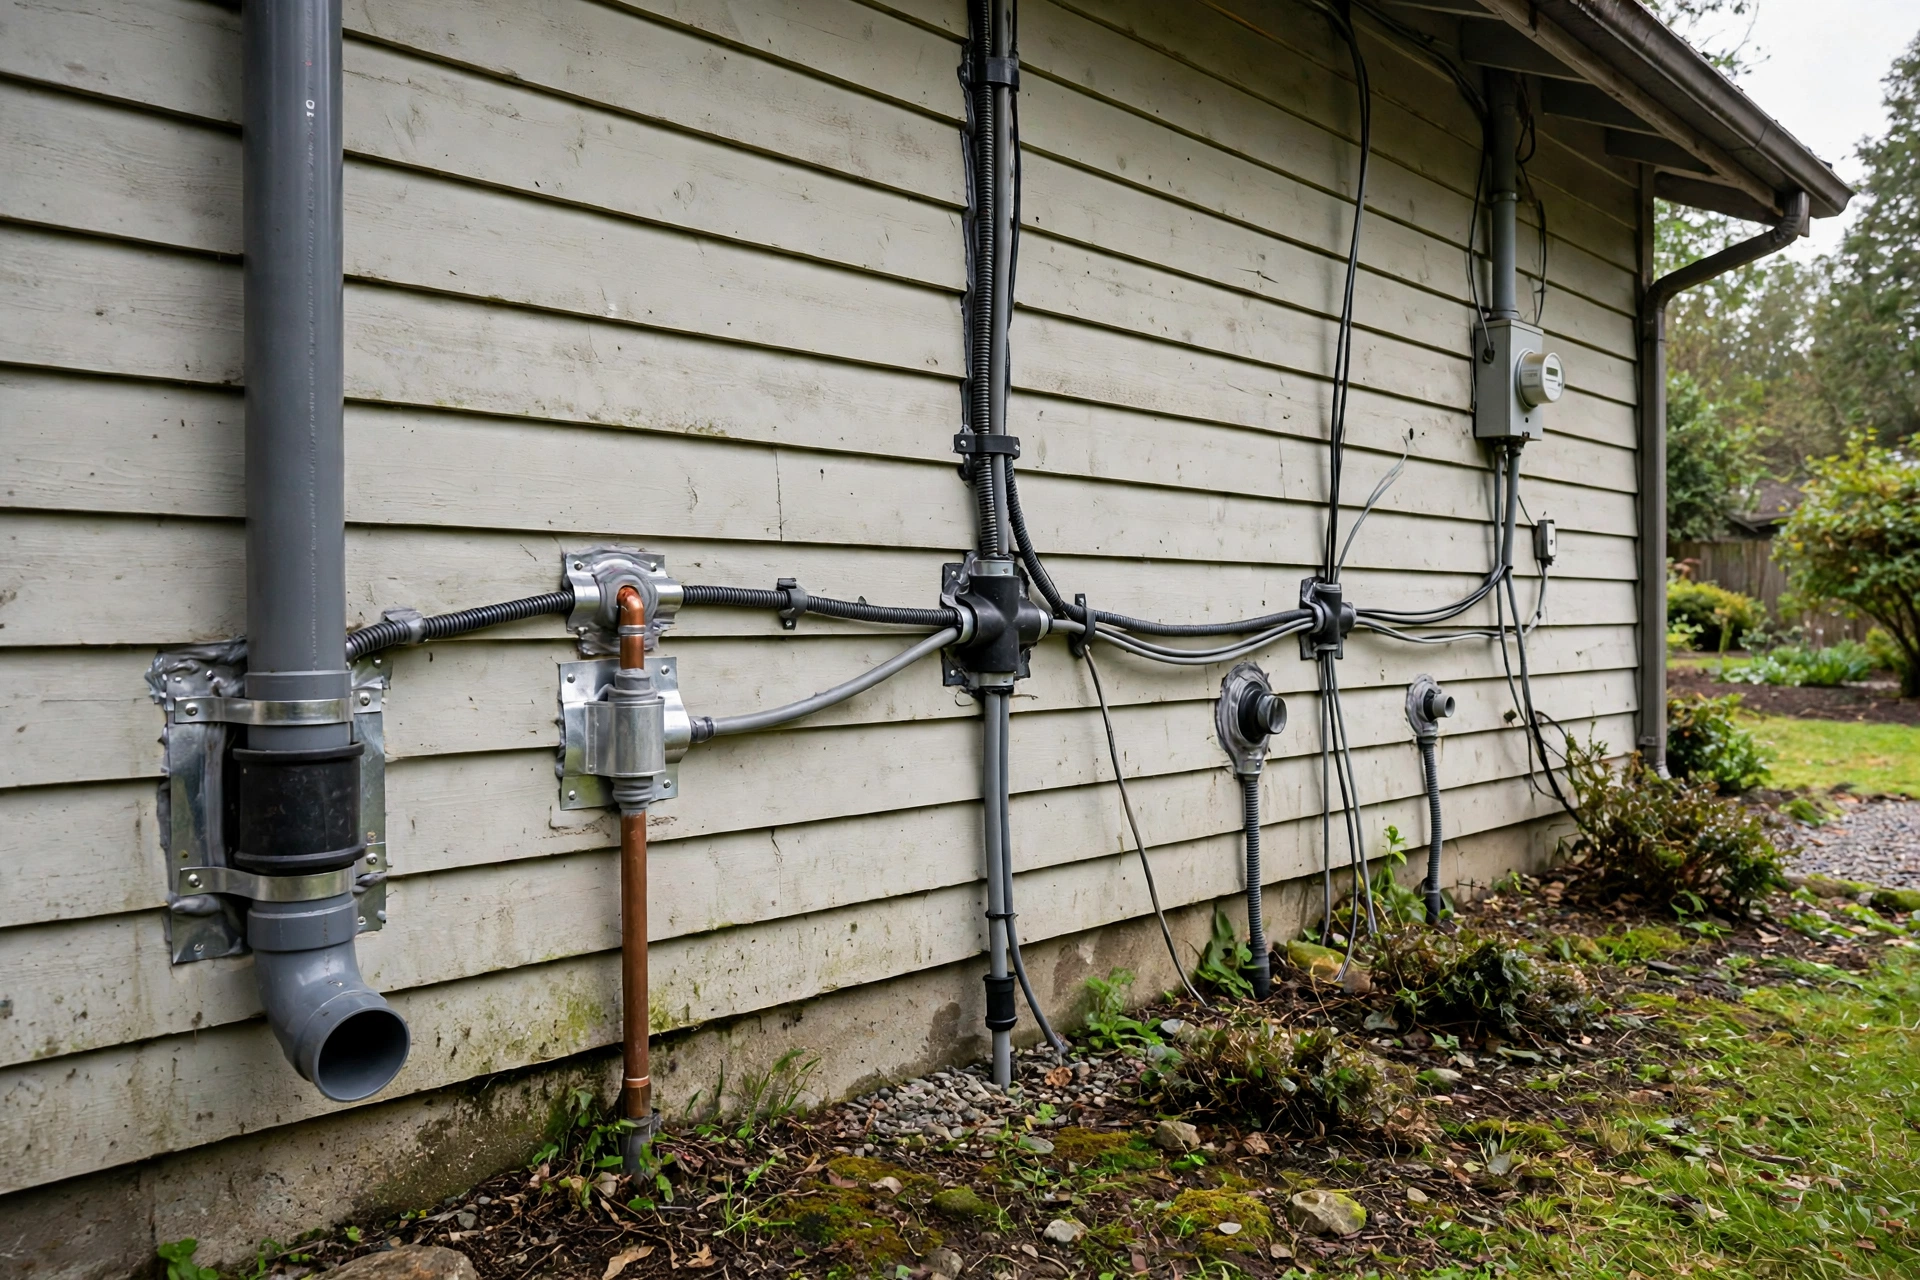
A complete seal has four layers, and each one has a job. The water-resistive barrier, usually housewrap, is cut around the opening and lapped so that upper layers overlap lower ones, shedding water downward. Flexible flashing tape or liquid-applied flashing bonds the barrier to the utility itself, closing the seam where the two meet. Sealant fills the annular space between the utility and the edge of the hole. And a mechanical cover, such as a flange or an escutcheon plate, sheds bulk water and protects the sealant from sun and weather.
- Water-resistive barrier lapped shingle-style around the opening
- Flexible flashing tape or liquid flashing bonded to the utility
- Exterior-grade sealant filling the annular gap around the pipe or cable
- A flange, escutcheon, or storm collar that sheds water away from the joint
The order matters as much as the materials. Flashing tape goes on before the siding, sealant goes in after the utility is fixed in place, and the cover goes on last. A seal built backwards, with sealant under the flashing or a cover sealed all the way around so trapped water cannot escape, fails faster than a simple bead of caulk applied in the right sequence.
Cutting Openings That Fit the Utility Instead of Fighting It
The best seal starts with the hole itself. An opening cut to fit the utility closely, with just enough room for a sealant bead, is easy to seal and stays sealed. An oversized hole filled with a large mass of sealant is not, because sealant shrinks as it cures and cracks when it has to span a wide gap. Drill the hole slightly downhill from inside to outside, so any water that enters can drain back out instead of pooling in the wall.
Before drilling, check what is behind the wall. The International Residential Code limits holes through a bearing stud to 40 percent of the stud’s width, and a careless drill can hit wiring, plumbing, or a vent pipe. A stud finder, a small inspection hole, and a look at the wall from both sides take ten minutes and prevent damage that costs far more. Fix the pipe firmly in place before sealing, because a pipe that moves in its opening will break any seal around it.
Flashing Tape and Liquid Flashing Around Round Penetrations
Round penetrations are the hardest to flash, because flat tape does not want to wrap a circle. The reliable method is to use a flexible flashing tape that stretches and moulds around the pipe, applied in shingle fashion with the upper pieces overlapping the lower ones, and pressed firmly onto the water-resistive barrier for at least four inches around the pipe. Where tape cannot conform, a liquid-applied flashing brushed or troweled over the joint forms a continuous membrane that follows any shape.
| Flashing method | Best for | Key detail |
|---|---|---|
| Flexible flashing tape | Round pipes and conduits on flat walls | Stretch it around the pipe, lap shingle-style |
| Liquid-applied flashing | Irregular shapes and clustered penetrations | Apply in two coats, cover the full joint |
| Preformed pipe boot | Standard pipe sizes on new work | Seal the boot to the barrier before siding |
| Metal storm collar | Vertical pipes and vent stacks | Seal the top edge, leave the bottom open |
Whichever method is used, the flashing must bond to a clean, dry surface. Dust, frost, or a damp wall will defeat even the best tape, so wipe the area down and let it dry before applying. Press the tape with a roller or a firm hand, because air bubbles under flashing tape become channels for water the first time wind drives rain against the wall.
Sealant Selection for Pipes, Conduits, and Cables
Sealant choice depends on the joint and the utility. Polyurethane sealant grips masonry and wood, stretches with joint movement, and can be painted, which makes it the workhorse for most pipe penetrations. Silicone suits joints around metal and plastic where UV resistance matters, though it cannot be painted and it smells of vinegar while curing. Acrylic latex is easy to apply and paintable, but it shrinks and suits only small, stable interior joints, not dynamic exterior ones.
- Polyurethane for most exterior pipe and conduit penetrations
- Silicone for metal, plastic, and high-UV exposures
- Low-expansion closed-cell foam for large gaps before sealant
- Closed-cell backer rod for deep joints, so sealant forms the right profile
For gaps deeper than a quarter inch, push a closed-cell backer rod into the joint first, so the sealant sits at the correct depth and forms an hourglass profile that stretches instead of tearing. For large voids, a low-expansion closed-cell foam fills the space and creates an air barrier, and the sealant then finishes the outer surface. Never fill a wide gap with sealant alone, because the bead will shrink, crack, and fail.
Sleeves, Escutcheons, and Storm Collars That Shed Bulk Water
Sealant handles the fine work, but bulk water needs a mechanical answer. A sleeve, which is a short length of pipe set into the wall, gives the utility a smooth, standard surface to seal against and protects it from abrasion. An escutcheon plate covers the joint from the outside and, when sealed only around its top two-thirds, sheds rain while leaving the bottom open so any water that gets behind the plate can drain out.
Storm collars do the same job on vertical pipes and vent stacks, sitting like a small umbrella where the pipe passes through a flashing. Seal the top edge of the collar to the pipe and leave the bottom edge open, because a collar sealed all the way around traps water behind it. The same rule applies to vent hoods and hose bib flanges: seal the top and sides, leave the bottom free, and let gravity do the work it has always done.
Firestopping Where Penetrations Cross Rated Assemblies
Some penetrations pass through walls that must resist fire, such as the wall between a garage and a living space. In those assemblies the annular space around the utility must be sealed with a listed firestop system, not ordinary caulk, to restore the wall’s fire rating. Intumescent sealants, putty pads, and collars expand when heated, closing the gap as the pipe softens or burns away, and each system is tested for a specific wall type and a specific utility.
Firestopping is not a place for improvisation. The correct product depends on the wall assembly, the pipe material, and the required rating, and the manufacturer’s installation instructions state the exact depth and coverage needed. A firestop that is too thin or applied to the wrong assembly may look complete and still fail when it matters. When a penetration crosses a rated wall, check the local code and use a listed system installed exactly as tested.
Pest-Proofing Utility Openings Without Blocking Drainage
Utility penetrations are also pest highways. Mice, insects, and spiders follow pipes and cables into a house, and a gap that lets in water lets in pests too. The durable fix pairs a mechanical blocker with a sealant: copper or stainless mesh packed snugly around the pipe, then coated with polyurethane sealant. The mesh resists chewing, the sealant keeps out water and air, and the combination lasts far longer than either material alone.
- Pack copper or stainless mesh around the pipe before sealing
- Coat the mesh with polyurethane sealant tooled into a fillet
- Avoid steel wool in damp areas, because it rusts and stains
- Leave drip edges and weep paths open so water can still escape
Never block a drainage path to stop a pest. A weep hole, a drip edge, or the open bottom of a flange exists to let water out, and sealing it shut trades a pest problem for a water problem. The goal is a seal that stops animals and weather while still letting the wall dry, which means blocking the gap around the utility and leaving the wall’s own drainage features alone.
Inspecting and Resealing Penetrations on a Sensible Schedule
Sealant ages, flashing tape lifts, and houses move, so penetration seals need a routine. Walk the exterior once a year, ideally in spring, and look at every pipe, cable, vent, and hose bib. Press the sealant bead gently: if it is hard, cracked, or pulling away from the wall, cut it out and replace it. Check the flashing tape for lifted edges and the escutcheon plates for missing screws.
Pay special attention after any work on the house. A new air conditioner, a replacement dryer vent, or a satellite dish installation all create new penetrations, and the installer who drills the hole is not always the person who seals it. Add every new penetration to a simple list with its date, and check it at the next annual walk. A seal checked yearly costs minutes, while a leak found five years late costs a wall.
Exterior Penetration Sealing Questions Homeowners Ask Most
Can I seal around a pipe with ordinary caulk from the hardware store?
Only if it is the right type. Exterior-grade polyurethane or silicone sealant suits most pipe penetrations, while basic acrylic latex caulk shrinks and cracks outdoors. Match the sealant to the joint: polyurethane for most pipes, silicone for metal and high-UV spots, and always use a backer rod in deep joints.
Why does sealant keep failing around my hose bib?
Usually because the pipe moves, the gap is too wide for sealant alone, or the old sealant was applied over dust and paint. Fix the pipe firmly, fill a wide gap with backer rod or low-expansion foam, clean the surfaces, and apply a fresh polyurethane bead. Seal the top two-thirds of the escutcheon and leave the bottom open to drain.
Do cables need a conduit when they pass through an exterior wall?
Yes, in most cases. Loose cables move in the wind and gradually damage any sealant around them. Running cables through a short PVC conduit gives the seal a rigid, round surface to bond to, and the conduit can be flashed and sealed the same way as a pipe, which lasts far longer.
What is firestopping, and does my house need it?
Firestopping seals the gap around a utility where it passes through a fire-rated wall, such as the wall between a garage and a living space, using listed intumescent products that expand in heat. It restores the wall’s fire rating. If a penetration crosses a rated assembly, ordinary caulk is not enough and a listed system must be used.
How often should exterior penetration seals be inspected?
Once a year, in spring, plus after any new installation that creates a penetration. Look for cracked or hardened sealant, lifted flashing tape, and loose escutcheon plates. Replacing a failed bead takes minutes when caught early, while a leak that runs for years can rot framing before it is noticed.
Final Thoughts: Sealed Penetrations Keep Water, Air, and Pests Outside
A house has dozens of penetrations, and each one is a small test of the building’s weather skin. The test is passed with layers, not luck: a barrier lapped shingle-style, flashing bonded to the utility, sealant at the right depth, and a cover that sheds water while letting the wall drain. Build the seal in the right order, choose the product for the joint, and check the work once a year. Water, air, and pests will keep probing every opening, and a well-sealed penetration is the quiet answer that keeps them outside where they belong.